Pages

Tuesday, 14 October 2014

The Second Battle of Copenhagen 1807

Unlike the Battle of Copenhagen of 1801, which is famously remembered for Vice Admiral Horatio Nelson holding his telescope to his blind eye to miss Admiral Sir Hyde Parker's signal to withdraw, the Second Battle of Copenhagen (1807) saw the British Fleet blockade Copenhagen to capture the Danish-Norwegian Fleet anchored in port.

This post - comes after reading Sharpe's Prey by Bernard Cornwell, it is the fifth novel in the series. Following the Battle of Trafalgar in 1805, Napoleon lost not only the French Navy, but also the Spanish Navy, forcing him to delay his plans to invade the British Isles. The only country with a navy large enough to challenge that of the British, was Denmark-Norway. Denmark-Norway had the largest merchant fleet in Europe, as a result had the second largest navy to protect that fleet.  In July of 1807, Napoleon signed the Treaty of Tilsit with Tsar Alexander I of Russia, where Russia secretly agreed that Napoleon could invade the neutral state of Denmark-Norway and seize the Danish Fleet and use it to invade the British Isles.

British intelligence agencies had learned of the secrete between Napoleon and Alexander, and send political aids to Copenhagen to try and persuade the Crown Prince to loan the Danish Fleet to Britain to keep it safe from Napoleon. The Crown Prince refused as he believed Denmark neutrality would protect it from Napoleon's wrath.

The British believing that the Baltic Sea was of strategic importance for both defence and trade, assembled a force of 25,000 troops and 22 Battle and Bomb Ships set sail for Copenhagen. 8 other Battle and Bomb ships would sail and arrive later.

A small British force landed south of Copenhagen, commanded by General Sir Arthur Wellesley, defeated a larger force of Danish Regulars and Militia at the Battle of Koge, which allowed the British to establish Mortar pits on Danish soil. With the city surrounded, the British sent a request to General Ernest Peymann, who was in command of Copenhagen's defence force to surrender the Danish fleet or suffer the consequences. Peymann and others around him had prepared the city to endure a long British Siege, stockpiling food and supplies. Peymann believed that the British who were not barbarians like Napoleon, would never bombard the city, especially because they knew women and children were still in the city.

When the Danes refused to surrender the fleet, on September 2nd, the British opened up their mortar teams from both the ground and the sea.  The British also used Congreve Rockets during their bombardment, which were specifically used as incendiaries, causing major fires in the city. Some 5,000 bombs and rockets fell on Copenhagen the first night. During the day, the Danes went about their business as if the British siege was not taking place. Following a clean up, and burying their dead, things went on like normal. For the next two nights the British resumed bombing, but using less and less bombs and rockets, which led Peymann to believe the British were running low on munitions, and would have to wait for replenishment from Britain, so he refused to hand over the Danish fleet.

The Crown Prince, and the mass of the Danish-Norwegian Army was in the South of Denmark preparing to defend against a French invasion. Defending against an invasion for the same purpose, to protect the Danish Fleet.  The Crown Prince, fearing a worse wrath of the British fleet, and perhaps a Breach attempt of Copenhagen's walls by General Wellesley, send word to burn the Danish fleet, so that it could not fall into the hands of either Britain or France.

Shelling of Copenhagen Sept 4th 1807

On the night of September 5th, the British released a fire-storm of more than 7,000 bombs and rockets on Copenhagen, targeting a new section of the city. Perhaps it was because of the confusion of that night, the Prince's order to burn the Danish Fleet was never followed, and the Danes sued for peace. Close to 200 civilians were killed and close to 800 were injured. Much of the city was burned, and would take a generation to rebuild.

The British captured 24 Battle Ships, 17 Frigates, 11 Brigs, and 3 Gunships. Because they were not handed over, but captured during a 'war' the British treasury paid out small fortunes in Prize money for capturing enemy vessels. In doing so, it ensured that Napoleon could not invade Britain, but forced Denmark to ally itself with France.

The British left Copenhagen in October 21st 1807, but would become more involved in the war against Napoleon, which would last until 1814.

Perhaps it is because the British Navy bombarded a largely civilian population, or perhaps it is because they basically stole a neutral countries fleet to protect itself, the Second Battle of Copenhagen is largely forgotten - well today it is remembered.

For a great Historical Fiction perspective on it - read Sharpe's Prey.

Remembering History - The Second Battle of Copenhagen 1807

Monday, 22 September 2014

The Capture of Gawilghur 1803


This is my third post following the events of the Richard Shape series by Bernard Cornwell - and will discuss the British capture of the Fortress of Gawilghur - which until 1803, had never been captured by enemy forces. This event was dramatically described in Sharpe's Fortress 

The fortress of Gawilghur was a strongly fortified mountain stronghold of the Maratha Empire in the Deccan Mountain range in India. The exact date of its construction is unknown, but it was believed to have been heavily fortified around 1424. The the fortress combined two forts, and outer and an inner. It was always believed that the Outer fort was to deter an attacking enemy while those inside retreated to the inner fort, which was protected by a ravine, and only had one entrance, only  accessible through a gate house, via a narrow twisting corridor. 

Following the British victory against the Maratha at the battle of Argaum, the remaining Maratha forces retreated to the mountain strong hold, believing that they could outlast the British forces. 

The British forces, led by Sir Arthur Wellesley set up camp at  the base of the mountain, well out of range of the fortresses guns, and began building a road up to the fortress, where they would establish a base for its guns to open a breach in the Outer Forts walls. The outer walls were in poor repair, as it was always meant as a decoy, and the British were successful in breaching the walls, and sent in the 11th Regiment of Foot, 94th Regiment of Foot, and a group of Sepoys on December 15th 1803. 

The Inner fort had a small service entrance at the south side, was was virtually inaccessible for an army. That being said, the 74th and 78th Highlanders attached the south side as a diversion, so that the Maratha forces believed they were being attached on two fronts. 

The breach was extremely steep, due to the fact that much of the walls were built on the end of cliffs. British soldiers had difficulty climbing while keeping their riffles in their hands. Many resulted in almost crawling to ascend the breaches. 

Once the British made it up the Breaches, they quickly over ran the defending Maratha forces. And for reasons yet to be discovered, instead of allowing the retreating forces inside the inner fort, the doors we closed. (Most likely due to a fear the British would advance too quickly). The retreating forces were slaughtered by the British and Sepoy troops. 

Perhaps over confident by their quick capture of the outer fort, the British sent in wave after wave to capture the gate house of the inner fort, and were slaughtered. The narrow twisting corridor housed three doors to gain access to the inner fort, and the walls above the corridor were heavily defended, and the Maratha forces threw rockets and musket fire at the approaching British troops. With no success after three waves, the assault looked doomed. 

Doomed, until Captain Campbell and his 94th Light Infantry discovered a difficult, but accessible way to climb the inner walls, out of sight of the defending Maratha forces. They were successful in fighting the Maratha forces around the gate house from behind, catching them by surprise, and opened up the doors to the awaiting forces outside. 

By the end of the day the once great fortress of Gawilghur had fallen, and the British had suffered the loss of 150 soldiers, while the Maratha had lost close to 4000, in what can only be seen as a lopsided miscalculation of a forts capabilities. 

A number of prominent historians have questioned why the Maratha did not further fortify both the outer and inner fort before the British attacked. While the Fortress of Gawilghur did not poses the riches of gold as others the British captured, but it had a fully stocked armoury that was never fully deployed. The British took more than a week building a road up to the fort, ample time for the Maratha to further defend both forts. Jac Weller (Military Historian) was quoted a number of times before he died as saying about Gawilghur, {that} 'three reasonably effective troops of Boy Scouts armed with rocks could have kept out several times their number of professional soldiers' 

The fall of Gawilghur ended the Second Anglo-Maratha war. The British did return the fort to the Maratha Empire - but it was never restored or used as a stronghold again. Total the walls lay in ruins, and the breaches can still be climbed if your up to the steep climb. 

Remembering the Capture of Gawilghur - December 15 1803 


Monday, 28 July 2014

The Battle of Assaye 1803

The Second Post of mine to be inspired by Bernard Cornwell's Richard Sharpe series - The Battle of Assaye in September of 1803 is the centre of the novel - Sharpe's Triumph 


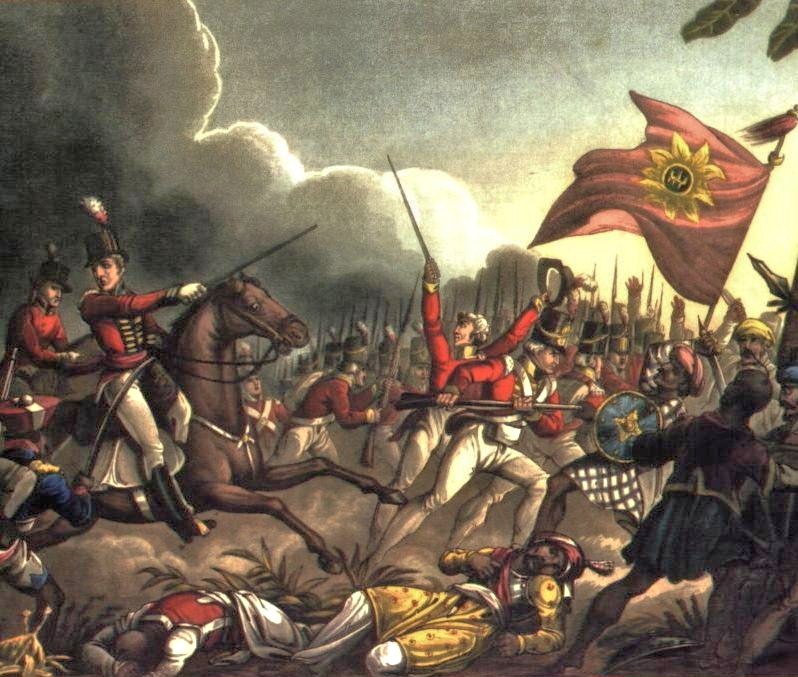
Major General Arthur Wellesley (later First Duke of Wellington) (mounted) commanding his troops at the Battle of Assaye
The Battle of Assaye - is one of the most decisive battles, and lopsided British victories I have ever read about.  It was a major battle in the fields outside of the small Indian village of Assaye, part of the Second Anglo-Maratha War, fought between the Maratha Confederacy and the British East India Company in September of 1803.

Originally one large army, in August 1803 - General Arthur Wellesley separated his force, and gave half of it to the command of Colonel James Stevenson. By dividing his army, Wellesley thought he would be able to seek out the Maratha faster - and support the other Army once the enemy was located. Stevenson's army throughout the summer continued a hot pursuit of Maratha cavalry that continued to raid into Hyderbad. 

In September, Wellesley received intelligence that the Maratha had created an encampment, and he planned on attacking them while they were unprepared. Wellesley anticipated that it would take three days for his army to travel to meet the Maratha Army, but the Maratha encampment was nearly 10km farther south than Wellesley's intelligence suggested, meaning the two armies converged after two days.

The Maratha Army of nearly 70,000 infantry and cavalry was under the command of Colonel Anthony Pohlmann, a German native, who was previously a Sergeant in the British East India Company - and had sold his services to the highest bidder. Pohlmann had received word that Wellesley and Stevenson were planning to converge on his camp, and established himself on the far side of the River Kaitna and River John, and fortified the only two fords that were thought to exist - believing they would destroy the British red coats when they attempted to cross the river.

When Wellesley first say the fields that would become the battle field, he feared crossing the river at the known fords, until he saw the villages of Peepulgaon and Waroor on opposite sides of the river. Despite local intelligence that no ford existed, Wellesley knew that the two neighbouring villages must be connected. He was right. Wellesley's Army was able to cross the river with little resistance from the Maratha Army.

During the crossing, the Maratha cannons fired on the crossing infantry units - and started to do their damage - the fords did not allow the British to bring their artillery across the river - and the Infantry and Indian units would advance in a tight line within musket range of the gunners.  The Maratha had 98 cannons firing at the advancing the British line, which would cause major casualties on the advancing British line.

Where the battle was won was on the 74th and 78th Highlander Infantry Front - both units sent a battalion of pickets marching towards the firing artillery - and continued to within musket range. The Maratha had never seen a single unit so determined - as the kilted 78th continued their advance - following the volley musket fire - they charged with bayonets which caused the gunners to abandon their positions. When the awaiting Maratha saw their gunners where overrun by a single British unit - many began to run in fear. The 74th had misunderstood Wellesley's orders and on their approach came too close to the village of Assaye. Assaye - which meant they were partly surrounded by the remaining Maratha artillery and the artillery from Assaye. The 74th used the bodies of their dead comrades to protect themselves from the continued oncoming fire, while at the same time attacked by the Maratha cavalry from their rear. Wellesley realized that if the 74th was destroyed the right flank would be open - and sent in British cavalry to support them.

Once the cavalry arrived to support the 74th - the remaining Maratha Army began to flee - and Wellesley - with his Army of approximately 10,000 infantry and cavalry - had defeated the Maratha Army of 70,000 - but this came at a great cost. The British East India Company and the British Army suffered 428 killed, 1138 wounded and 18 MIA, while the Maratha army -  suffered more than 6,000 casualties and lost 98 cannons captured.

The 74th started with a strength of about 500 men - had ten officers killed, 7 more officers wounded. Another 124 men from the ranks were killed and another 270 wounded. the 74th Picket Battalion only had 75 men remaining.

Stevenson and his Army never made it to the Battle - although they were only 10 km West - he was mislead by his guide - who he later executed believing that he was purposely mislead. Wellesley for the rest of his career described Assaye as his Greatest victory, but the "bloodiest for the numbers that he ever saw"

Remembering History - The Battle of Assaye - 1803 

Sunday, 20 July 2014

The Siege of Seringapatam 1799

I have recently taken to reading Bernard Cornwell's Richard Shape novels. In his first novel, Sharpe's Tiger the main character Private Sharpe serving in the Kings Army in India takes part in the Siege of Seringapatam. Following finishing the book - I opted to do some research on the battle that was the main focus of the novel.

The Last Effort and Fall of Tippoo Sultan by Henry Singleton
The Siege of Seringapatam in 1799 was the second siege of the great fortress city by the British Red Coats - the first occurred in 1792. In 1799, after several years of the Tipu Sultan's rule, the British decided that it was time to replace him as the ruler of the Kingdom of Mysore - and the siege ended the Fourth Anglo-Mysore War, which had been waging for a year, and was the final of the Anglo-Mysore Wars.

The Tipu Sultan believed that with Napoleon's landing in Egypt in 1798 would lead to France challenging British rule in India. The Tipu had several French officers in his service, and believed that if he could defeat the British and their allies, he would be welcomed by Napoleon for making his conquering of India easier. Colonel Arthur Wellseley (later the 1st Duke of Wellington) had other ideas, and marched his Army towards Seringapatam to end the Tipu's rule.

When the Fourth Anglo-Mysore War broke out, the British assembled in to large armies under General George Harris, with troops from the British East India Company, and local Indian Sepoys - mainly supplied by the Nizam of Hyderabad. The two forces together numbered some 50,000 Infantry and cavalry. They faced a fortified city with the Tipu's forces numbering 30,000 - largely diminished following the third Anglo-Mysore War.

Although outnumbered the Tipu had planned to massacre the British troops when they breached the walls of Seringapatam. During the siege of 1792, the British breached the North-West Wall and captured the city. Harris and Wellseley planned to breach the same part of the walls, as it had been poorly rebuilt - not knowing the Tipu had planted a large mine beneath the wall, and built a secondary wall behind the first. The Tipu planned to ignite the mine when the British breached the exterior wall, and got themselves trapped between the two walls.

Over night on May 1st, the British established their batteries and began their breach on May 2nd at Sunrise. The batteries of Hyderabad opened a practical breach in the outer wall early in the morning hours, and they were lucky enough that one of their artillery rounds struck the mine beneath the wall, causing it to detonate prematurely.

On May 4th in the mid afternoon- the British 73rd and 74th Highland Regiments climbed the breach and the ramparts attacking the city - and the Tipu's forces quickly surrendered to the fearsome Scottish troops. The British attacked during the hottest hour of the day - as it caught the Tipu's forces re-hydrating. Within 16 minutes of assaulting the great city - the British had complete control of the city - and the Tipu was found dead in the Water Gate - having been shot several times.

Two of the Tipu's cannons which were caputured during the battle are now displayed at the Royal Military College in Sandhurt, and the Tipu's Tiger - an automaton was captured and is now on display at the Victoria & Albert Museum.

Add captionTipu's Tiger in the V&A Museum, London showing the prostrate European being attacked

Remembering History - The Siege of Seringapatam 1799

Thursday, 5 June 2014

Most Decisive Battles of World History

This is a working List - based on a course given by Professor Gregory S. Aldrete (University of Wisconsin). I have added several battles that I believe should be on this list - Before I get to work - I want you opinion if anything else should be included?

- 1274 BCE - Kadesh - The Greatest Chariot Battle
- 479 BCE - Plataea - Greece Wins it's Freedom
- 331 BCE - Gaugamela - Alexander's Genius
- 197 BCE - Cynoscephalae - Legion Vs. Phalanx
- 31 BCE - Actium  Birth of the Roman Empire
- 260-110 BCE - China Struggles for Unification
- 636 - Yarmouk & Al-Qadisiyyah - Islam Triumphs
- 751 - Talas & 1192  - Tarain - Islam into Asia
- 1066 - Hastings - Williams Conquers England
- 1187 - Hattin - Crusader Desert Disaster
- 1260 - Ain Jalut - Can the Mogols Be Stopped?
- 1410 Tannenberg - Cataclysm of Knights
- Frigidus, Badr, Diu - Obscure Turning Points
- 1521 - Tenochtitlan - Aztecs Vs. Conquistadors
- 1532 - Cajamarca - Inca Vs. Conquistadors
- 1522- Rhodes - The Ottomans expel the Knights
- 1526 & 1556 -  Panipat - Babur & Akbar in India
- 1565 - Malta - The Knights Defeat the Ottomans
- 1571 - Lepanto - Last Gasp of the Galleys - Knights Crush the Ottoman Fleet
- 1592 - Sacheon - Yi's Might Turtle Ship
- 1600 - Skigahara - Samurai Showdown
- 1683 - Vienna  - the Great Ottoman Siege
- 1709 - Poltava - Sweden's Fall, Russia's Rise
- 1759 - Quebec - Battle for North America
- 1776 - Trenton - The Revolution's Darkest Hour
- 1781 - Yorktown - The French and Americans join forces to defeat Britain
- 1805 - Trafalgar - Nelson Thwarts Napoleon
- 1807 - Copenhagen - The British Bomb the Danes into Submission
- 1813 - Leipzig - The Grand Coalition
- 1824 - Aycucho - South American Independence
- 1836 - San Jacinto - Mexico's Big Loss
- 1862 - Antietam - The Civil War's Bloodiest Day
- 1866 - Koniggratz - Bismark Molds Germany
- 1905 - Tsushima - Japan Humiliates Russia
- 1914 - Marne - Paris is Saved
- 1916 - Jutland - largest naval battle and the only full-scale clash of battleships in WW1
- 1939 - Khalkhin Gol - Sowing the Seeds of WW2
- 1939-45 - Battle of the Atlantic - Germany forced into Submission
- 1942 - Midway- Four Minutes that Changed Everything
- 1942 - Stalingrad - Hitler's Ambitions are Crushed